Hippity Hop
Here comes
Peter Cotton Tail! ;)
With Easter
just around the corner there are a lot of moms posting pictures on Instagram
and Facebook of their Easter egg decorating adventures with their little ones.
Mason was still
a little young last year so we didn't do any decorating. So this year I’m extra
excited to do something with him.
I started doing
some searching on some toddler friendly ways to decorate Easter eggs. I wanted something
that wouldn't bore Mason, but I also didn't want his fingers to end up all
sorts of colors from dyeing eggs.
I found a
several different fun decorating ideas. I’m not sure if we’ll use them all this
weekend, but in case you haven’t done your Easter egg decorating here’s a
couple ideas for you.
Sticker eggs
The easiest egg decorating idea
that requires no dye is stickers. Simply use small round stickers in different colors
to create a pattern like a flower or keep it simple with a few big dots.
Toddlers love stickers and you may even have some spare from reward charts,
calenders or children’s comics.
Glue and Glitter eggs
Polka dot glitter eggs are simple
yet stunning! The eggs below in pretty polka dot blue and pink glitter are a
great example. For young children you don’t have to be that neat. Just roll in
glue or get ‘stick-happy’ with the glue stick and roll in glitter.
Tattoo eggs
Remember those pretend tattoo
transfers when you were young? Well, they look great on eggs too. Just follow
the instructions on the transfers.
Stencil eggs
This uses the same resources as
the sticker eggs, but this time you put the stickers on before you dye the eggs
and peel the stickers off once the eggs are dry.
Double sided sticky taped eggs
Strong geometric shapes work
best. Cut the double sided sticky tape into strips that are 0.5 cm thick and
attach to your egg. Use separate bowls for different colors of glitter. Remove
the backing from one strip of double sided sticky tape and firmly roll the egg
in the darkest color of glitter. Gently remove the extra glitter. Then repeat
for your next color of glitter.
Here are some
more in depth directions on a couple fun decorating ideas.
Sparkly Spots
Give your Easter eggs an eye-catching effect. Make glittery
polka dots without the mess using glue dots and fine glitter.
What you'll need: Hardboiled or blown out egg, bottle cap, ½" glue dots, fine
glitter, small plate, paintbrush
Make it: Rest the egg on bottle cap, then apply about 12 glue dots, about
½" apart. Pour glitter onto a small plate and press each glue dot into the
glitter until completely covered. Repeat for each glue dot. When all of the
dots are coated, use the paintbrush to wipe away any excess glitter.
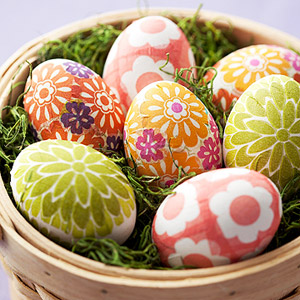
Beautiful Blooms
For an Easter decoration you can use
year after year, have kids cut flowers from paper napkins and decoupage them
onto ceramic eggs.
What you'll need: Floral paper napkins, scissors, foam brush, Elmer's glue,
blown-out or ceramic egg, small roll of tape
Make it: Cut flowers or desired design from paper napkins. If using 2-ply
napkins, peel away the thin white paper backing from the cutout napkin pieces
(this will make it easier to glue to the egg). Use a foam brush to apply glue
to half of the egg, then press a napkin flower on top and cover with a thin
layer of glue. Add more napkin flowers, one by one, making sure to brush the
top of each with glue. Place the half covered egg on the roll of tape and let
dry for about 15 minutes, then repeat for the other half of the egg. When
completely covered, set the egg on roll of tape and let it dry overnight.
Happy decorating! Feel free to posts pictures on our Facebook page of
your Easter Egg decorating fun!
xoxo,
Krista


Comments
Post a Comment